SQLite is a Database Management System used to store and manage data in a structured format. The lite in SQLite means lightweight in terms of setup, database administration, and required resources.
SQLite allows developers to create databases, organize data into tables, and perform operations like inserting, updating, and querying data. It is easy to use and does not require a separate server to run. It is perfect for applications that need to store data locally on a device, like mobile apps or desktop software. SQLite is also fast and reliable.
SQLite is a type of Relational Database Management System (RDBMS). A RDBMS allows the user to store data in tables made up of rows and columns and supports SQL (Structured Query Language) to manipulate the data. It allows users to store, manage, and retrieve data in a structured format organized into tables with rows and columns. Users can define relationships between different tables, perform queries to retrieve specific data, and execute transactions to ensure data integrity.
SQLite was created in the year 2000 by D. Richard Hipp, who continues to lead the development of the software today. He created SQLite to provide a simple, lightweight, and efficient database solution that could be embedded into software applications without requiring a separate server. Hipp designed SQLite to be fast, reliable, and easy to use, making it suitable for a wide range of projects and environments.
Why Use SQLite?
SQLite is lightweight, serverless and self-contained, making it an excellent choice for developers looking to embed a database system within their applications. SQLite commands are fundamental in manipulating data stored Relational Database Management System (RDBMS).
SQLite is popular for several reasons. They are as follows –
Simplicity: SQLite is easy to set up and use, making it accessible to developers of all skill levels.
Ease of Use: SQLite is very easy to get started with, as it requires no setup or configuration. You can simply include the library in your project and start using it.
Portability: SQLite databases are self-contained files that can be easily shared and transferred between different systems, making it convenient for use in various environments.
No Server Required: Unlike MySQL, PostgreSQL, SQLite does not require a separate server to run, reducing setup complexity and resource requirements.
Efficiency: SQLite is lightweight and optimized for performance, allowing for fast data access and manipulation, even in resource-constrained environments.
Flexibility: It supports a wide range of SQL features and data types, making it suitable for a variety of applications, from mobile apps to desktop software to embedded systems.
How to Installation SQLite on Windows
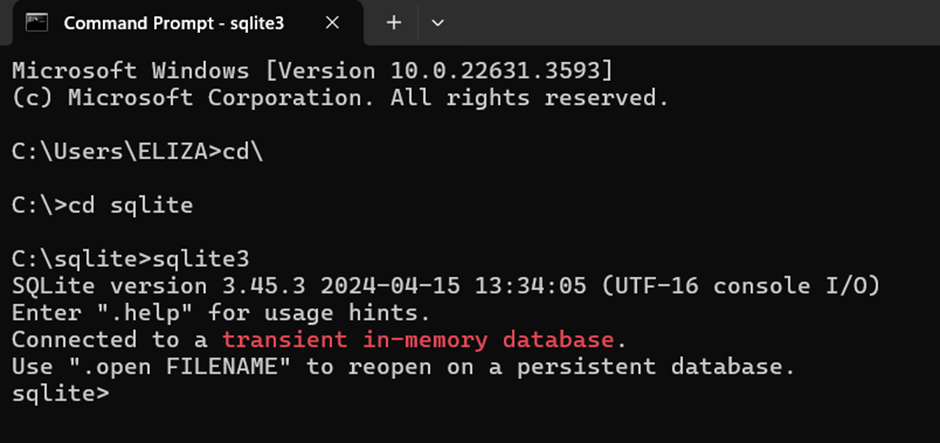
If we want to install the official SQLite and interact with the database using the terminal, we can follow these steps:
- Visit the official website of SQLite to download the zip file.
- Download that zip file.
- Create a folder in C or D (wherever we want) for storing SQLite by expanding the zip file.
- Open the command prompt and set the path for the location of the SQLite folder given in the previous step. After that write “sqlite3” and press enter.
We can also directly open the .exe file from the folder where we have stored the SQLite whole thing.
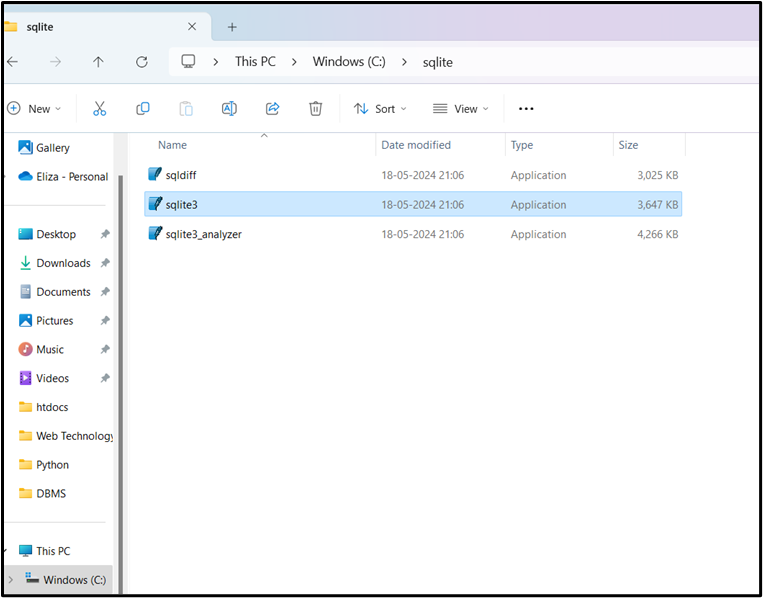
After clicking on the selected .exe file it will open SQLite application.
SQLite Commands
The standard SQLite commands CREATE, INSERT, SELECT, UPDATE, DELETE and DROP. These commands can be classified into groups based on their operational nature –
DDL (Data Definition Language)
In SQLite, DDL commands are used to define(create), alter and delete (drop) database objects. These commands are typically used by database administrators and developers to establish and maintain the database schema. DDL commands are fundamental for defining the framework of a database.
CREATE TABLE, DROP TABLE are some of the DDL commands.
| Commands | Description |
| CREATE | Used to create new database objects, such as tables, views etc. |
| ALTER | Used to modify the structure of existing database objects, such as a table. |
| DROP | Used to delete existing database objects entirely, such as tables, views, including their data and structure. |
DML(Data Manipulation Language)
DML commands are used to manage data within database tables, including inserting new records, updating existing records, deleting data, and retrieving it.
| Commands | Description |
| INSERT | Adds new rows (records) of data into a table. |
| UPDATE | Modifies existing data in one or more rows of a table. |
| DELETE | Removes one or more rows of data from a table. |
DCL (Data Control Language)
DCL, or Data Control Language, in SQL refers to a set of commands used to manage access and permissions within a database system. DCL commands are primarily concerned with the security of the database, controlling who can perform specific actions on database objects like tables, views etc.
The two main DCL commands:
GRANT:
This command is used to give specific access privileges or permissions to a user or role. These privileges can include actions such as SELECT, INSERT, UPDATE, DELETE on tables, or EXECUTE on stored procedures. DCL commands are crucial for database administrators to maintain data security and ensure that users only have the necessary access rights to perform their tasks, preventing unauthorized access or modification of data.
Example:
GRANT SELECT, INSERT, DELETE ON Employees TO John;
This example grants the user ‘John’ the ability to SELECT, INSERT and DELETE data into the ‘Employees’ table.
REVOKE:
This command is used to remove previously granted access privileges or permissions from a user or role. It effectively withdraws the permissions that were given using the GRANT command.
Example:
REVOKE SELECT, INSERT, DELETE ON Employees FROM ‘John’;
This example revokes the SELECT, INSERT and DELETE privilege from ‘John’ on the ‘Employees’ table.
Note:
SQLite does not support the Data Control Language (DCL) commands GRANT and REVOKE for managing user privileges. This is due to its design as an embedded database engine, where the database is typically accessed directly as a file by the application.
These command s are typically found in client-server RDBMS systems (like MySQL, PostgreSQL, SQL Server) where multiple users might access the same database and require different level of permission.
DQL (Data Query Language)
Data Query Language (DQL) is a sub-language within SQL (Structured Query Language) used specifically for querying and retrieving data from a database. Its primary purpose is to extract information based on specified criteria.
| Command | Description |
| SELECT | Retrieves records from one or more tables |
TCL(Transaction Control Language)
Transaction Control Language (TCL) in SQL consists of commands used to manage and control transactions within a database.
The primary TCL commands are:
COMMIT, ROLLBACK and SAVEPOINT are considered as Transaction control commands. When dealing with transactions within a database COMMIT, ROLLBACK and SAVEPOINT commands are used.
COMMIT:
This command is used to save all changes made during the current transaction permanently to the database. Once committed, the changes become visible to other users and are durable.
Syntax:
COMMIT;
ROLLBACK:
This command is used to undo all changes made during the current transaction since the last COMMIT or SAVEPOINT. It restores the database to its state before the transaction began or to a specified savepoint.
Syntax:
ROLLBACK;
SAVEPOINT:
This command allows us to set a named point within a transaction to which we can later roll back. This is useful for managing complex transaction where we might want to undo only a portion of the changes without rolling back the entire transaction.
Syntax:
SAVEPOINT savepoint_name;
ROLLBACK TO SAVEPOINT:
This command is used in conjunction with SAVEPOINT to undo changes up to a specific savepoint within the current transaction, leaving earlier changes intact.
Syntax:
ROLLBACK TO savepoint_name;
Creating a Table
To create a table in SQLite, the CREATE TABLE SQL statement is used. This statement defines the table’s name, its columns, their data types, and any associated constraints. A unique name should be assigned to the table. This name should generally be descriptive of the data the table will hold (e.g., Students, Employees, Products, Orders).
Column Definitions:
Each column in the table must be defined, specifying its name and data type.
Column Name: A unique name is given to each column within the table, representing a specific attribute of the data (e.g., RollNo, EmployeeID, ProductName, OrderDate).
Data Type: The data type specifies the kind of data that can be stored in the column (e.g., INT for integers, CHAR for characters). The chosen data type dictates how data is stored and the operations that can be performed on it.
Syntax:
CREATE TABLE table_name ( Column1 DataType , Column2 DataType, Column3 DataType, … , ColumnN DataType);
Example:
CREATE TABLE STUDENTS (ROLL_NO INT, NAME CHAR, ADDRESS CHAR, DOB DATE);
The above command creates a table named “STUDENTS” with four columns: ROLL_NO, NAME, ADDRESS, and DOB.
SQLite Show Tables
We can verify if the table has been created successfully using SQLite command .tables command. This command will output a list of all table names.
Example:
.table
STUDENTS
Display the Structure of a Table
To display the structure of a table in SQLite, two primary methods are available:
1. Using .schema Command:
This command displays the CREATE TABLE statement used to define the table, including column names, data types, constraints (like PRIMARY KEY, NOT NULL) etc.
Syntax:
.schema table_name
We have to replace table_name with the actual name of the table we want to inspect. There is no semicolon (;) after the table name when using dot commands.
Example:
.schema students
CREATE TABLE STUDENTS(ROLL_NO INT, NAME CHAR, ADDRESS CHAR, DOB DATE);
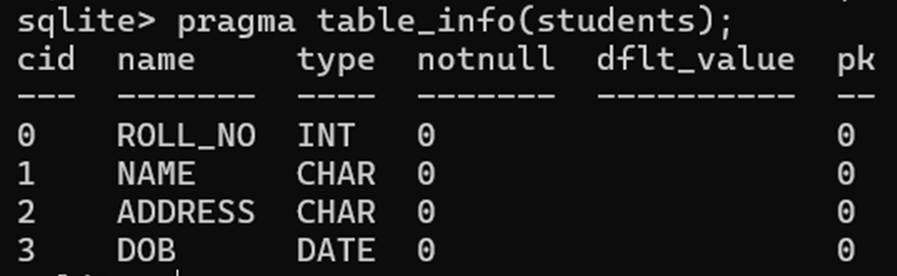
2. Using PRAGMA Command:
We can also use PRAGMA command with the table_info() function to get the details and description of a table. This SQL query returns a result set containing detailed information about each column in the specified table. The result set typically includes columns like cid (column ID), name (column name), type (data type), notnull (whether it’s nullable), dflt_value (default value), and pk (whether it’s part of the primary key).
But it is necessary to execute another command .mode column before the PRAGMA command to make the output understandable and clear. This command is a dot-command which is used to set the mode as Columns, which will display the entire table with the column name and space separated, which is much more human readable. After executing .mode column command, we can use the pragma command to get more detailed and structured result.
Syntax:
.header on
.mode columns
pragma table_info (table_name);
Example:
.header on
.mode columns
pragma table_info (students);
DROP a TABLE:
To drop a table in SQLite, we use the DROP TABLE statement. This statement removes the table definition and all associated data.
Syntax:
DROP TABLE TABLE_NAME;
Example
DROP TABLE STUDENTS;
Add Data to the Table / Inserting Records into a Table
To add data to a table, the INSERT INTO statement is used. This statement allows for the insertion of new rows into a specified table. There are two primary ways to use the INSERT INTO statement:
1. Inserting Values into Specific Columns
To insert values into specific columns, we must specify the column names in the INSERT INTO statement before providing the VALUES. This approach is useful for inserting data into a subset of columns, leaving the rest to be populated with default values or NULL.
Syntax:
INSERT INTO TABLE_NAME (column1, column2, column3, …) VALUES (value1, value2, value3, …);
Here, column1, column2, … are the names of the columns in the table into which we want to insert data.
Example:
INSERT INTO STUDENTS (ROLL_NO, NAME) VALUES (1,’SAMEER’);
Note:
- Character values are typed within single quotes or double quotes.
- Date values are typed within single quotes or double quotes
- Numeric (number) values are typed as they are. No need to give quotes.
2. Inserting Values into All Columns
To insert values into all columns of a table in SQLite, you can omit the column list in your INSERT INTO statement. In this case, you must provide a value for every column in the table, and the order of the values must match the order of the columns as they were defined.
Syntax:
INSERT INTO TABLE_NAME VALUES (value1, value2, value3, … );
Example:
INSERT INTO STUDENTS VALUES (2,’PRIYANKA’,’Delhi’,’2-2-2000′);
Inserting Multiple Rows
We can insert multiple rows at once in a single INSERT INTO statement by providing a comma-separated list of value sets.
Inserting Values into all Columns of Multiple Rows:
Syntax:
INSERT INTO TABLE_NAME VALUES (value1, value2, value3, … ), ( value1, value2, value3, …), (value1, value2, value3, …);
Example:
INSERT INTO STUDENTS VALUES (1, ‘Priya’, ‘Tinsukia’, ’02/04/2005′), (2,’Liza’,’Dibrugarh’, ’05/05/2006′), (3, ‘Raja’, ‘Guwahati’, ’11/03/2000′);
Inserting values into specific Columns of Multiple Rows:
Syntax:
INSERT INTO TABLE_NAME (column1, column2, column3, …) VALUES (value1, value2, value3, …), (value1, value2, value3, …), (value1, value2, value3, …);
Example:
INSERT INTO STUDENTS (ROLL_NO, NAME) VALUES (4, ‘Amit’), (5, ‘Rohit’), (6,’Varsha’);
Formatting Output
Formatting the output in the sqlite3 command-line shell involves using “dot commands” to control how query results are displayed.
Changing Output Modes:
The default output mode in the SQLite command-line shell is “list”. In this mode, each row of a query result is presented on a single line, with column values separated by a default character, typically a pipe symbol (|).
Set header and column mode for better readability. To change list mode to column mode, the .mode command is used. The column mode presents query results in a more readable, tabular format with left-aligned columns.
Syntax:
.mode column
Displaying Headers:
To show column names in the output, use the .header command:
Syntax:
.header on
Setting Output Column Width:
In the sqlite3 command-line shell, we can adjust the output column width using the .width command in conjunction with .mode column. Sometimes, we will face a problem related to the truncated output in case of .mode column which happens because of default width of the column to be displayed. In that case, we can set column width using .width command followed by space separated integers, where each integer corresponds to the desired width of a column.
Example:
.width 10 20 15
This example sets the first column to a width of 10 characters, the second to 20, and the third to 15.
View Records From Table
SQLite SELECT statement is used to fetch the data from a SQLite database table.
View all records from a table:
To view all records from a table, we use the SELECT statement with the asterisk (*) wildcard, followed by the FROM keyword and the name of the table. The * wildcard selects all columns.
Syntax:
SELECT * FROM table_name;
Example:
SELECT *FROM STUDENTS;
Executing this query will return a result set containing all rows and all columns from the STUDENTS table.
View data of specific columns from a table:
To view specific columns from a table in SQLite, we use the SELECT statement, specifying the column names we want to retrieve. We can specify as many or as few columns as needed, separated by commas.
Syntax:
SELECT column1, column2 FROM table_name;
Here, column1, column2 are the fields of a table, whose values we want to fetch.
Example:
SELECT ROLL_NO, NAME FROM STUDENTS;
View Records based on a Condition
To view records based on a condition, the SELECT statement with a WHERE clause is used. The WHERE clause specifies a search condition to filter the rows returned by the query. Only rows that satisfy the condition will be included in the result set. We can use various operators (e.g., =, <>, >, <, >=, <=, LIKE, AND, OR) to build conditions.
View data of specific columns based on condition:
Syntax:
SELECT column1, column2, … FROM table_name WHERE condition;
Example:
SELECT NAME, ADDRESS FROM STUDENT WHERE ROLL_NO=2;
View data of all columns based on conditions:
To view all columns in a table based on a specific condition in SQLite, you use a SELECT statement with the asterisk (*) wildcard and a WHERE clause. The asterisk tells the database to retrieve every column for each row that matches your condition.
Syntax:
SELECT *FROM table_name WHERE condition;
Example:
SELECT *FROM STUDENT WHERE ADDRESS=’Tinsukia’;
Update Data in the Table:
To update data in a table, UPDATE statement is used. This statement modifies (change) existing records within a table. We can use WHERE clause with UPDATE command to update selected rows, otherwise all the rows would be updated. Users must be careful in the use of the Update statement as all the rows in the table can be affected if a WHERE clause is not specified in the UPDATE statement.
Updating a single value in a specific row:
Syntax:
UPDATE table_name SET column_name = value where condition;
Example:
UPDATE STUDENTS SET ADDRESS = ‘DELHI’ WHERE ROLL_NO = 1;
Updating multiple values in a specific row:
Multiple columns of a records can be updated by specifying all the columns and values separated by commas.
Syntax:
UPDATE table_name SET column1 = value1, column2 = value2, …., WHERE condition;
Example:
UPDATE STUDENTS SET ADDRESS = ‘Guwahati’, DOB = ‘1-1-2000’ WHERE ROLL_NO = 1;
Updating data (value) in multiple rows:
Multiple records in a table can be updated simultaneously using a single UPDATE statement. This is achieved by specifying a WHERE clause that selects multiple rows.
Syntax:
UPDATE table_name SET column1 = value1, column2 = value2, … WHERE condition;
Updating a single column in multiple rows based on a condition:
Example – 1:
UPDATE student SET address = ’Mumbai’ where address = ’Delhi’;
This statement updates the address to ‘Mumbai’ for all the students whose address is ‘Delhi’.
Example – 2:
UPDATE student SET address = ’London’ where roll_no in(2,5,8);
This statement updates the address to ‘London’ for all the students whose roll number is 2, 5 and 8
Updating multiple columns in multiple rows based on a condition:
Example:
UPDATE employees SET city = ‘Guwahati’, state = ‘Assam’ WHERE employeeid > 5;
This statement updates the city to ‘Guwahati’ and state to Assam for all employees whose employeeid is greater than 5.
Updating all rows in a table:
To update all rows in a table, we use the UPDATE statement without a WHERE clause.
Syntax:
UPDATE table_name SET column_name = value;
Example:
UPDATE students SET address = ‘Tinsukia’;
This statement sets the address of all students in the students table to ‘Tinsukia’.
Delete Records from a Table:
To delete records from a table, DELETE FROM statement is used. This statement can be used to remove specific rows based on a condition or to remove all rows from a table.
Deleting Specific Records:
To delete specific records, we include a WHERE clause with a condition that identifies the rows to be removed with DELETE command.
Syntax:
DELETE FROM table_name WHERE condition;
Example:
DELETE FROM STUDENTS WHERE ROLL_NO=2;
Deleting All Records from a Table:
To delete all records from a table, omit the WHERE clause. This will remove every row in the specified table.
Syntax:
DELETE FROM table_name;
Example:
DELETE FROM STUDENTS;
TRUNCATE TABLE Command
TRUNCATE TABLE command removes all rows from a table. We do not have TRUNCATE TABLE command in SQLite but we can use DELETE command to delete all rows from an existing table. TRUNCATE TABLE is functionally identical to DELETE statement without a WHERE clause: both remove all rows in the table.
TRUNCATE TABLE and DELETE statement removes all rows from a table, but the table structure and its columns remain. To remove table definition and its data, use the DROP TABLE command.
Syntax:
TRUNCATE TABLE table_name;
Example:
TRUNCATE TABLE STUDENT;
ALTER TABLE Command
The ALTER TABLE command in SQLite allows for modifications to the structure of an existing table. By using an SQLite ALTER TABLE command, we can perform following actions:
- Rename a table.
- Add a new column to a table.
Rename a Table:
To rename a table, we use the ALTER TABLE RENAME TO statement. The RENAME TO clause allows us to change the name of an existing table.
Syntax:
ALTER TABLE table_name RENAME TO new_table_name;
Example:
ALTER TABLE STUDENTS RENAME TO STD_INFO;
Add a New Column to a Table:
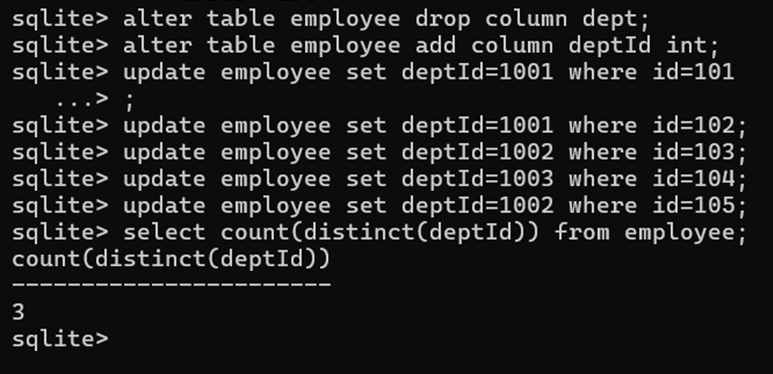
We can use ALTER TABLE command to add a new column to an existing table. In this scenario, SQLite appends the new column at the end of the existing column list. The ADD COLUMN clause appends a new column to the end of a table’s list of columns.
Syntax:
ALTER TABLE table_name ADD COLUMN column_definition;
Example:
ALTER TABLE STUDENT ADD COLUMN PHN_NO INT;
SQLite Operators
SQLite operators are special keywords or characters used in SQL statements to perform operations like arithmetic, comparisons, logical evaluations, and pattern matching. They are primarily used in a WHERE clause to filter data but can be used in other contexts as well.
Arithmetic Operators
Arithmetic operators are used to perform mathematical calculations on numeric values.
- + (Addition)
- – (Subtraction)
- * (Multiplication)
- / (Division): Returns an integer if both operands are integers; returns a float if one operand is a float.
- % (Modulo): Returns the remainder of a division.
Comparison Operators
Comparison operators compare two expressions and return TRUE (1), FALSE (0), or NULL.
- = or == Checks if two expressions are equal.
- != or <> Checks if two expressions are not equal.
- > Greater than.
- < Less than.
- >= Greater than or equal to.
- <= Less than or equal to.
Logical Operators
Logical operators combine multiple conditions in a WHERE clause to filter records.
- AND: Returns a result if all conditions are true.
- OR: Returns a result if any of the conditions are true.
- NOT: Negates a condition. For example, NOT IN or NOT BETWEEN.
AND Operator
The AND operator allows the existence of multiple conditions in a SQLite statement’s WHERE clause. While using AND operator, complete condition will be assumed true when all the conditions are true. For example, [condition1] AND [condition2] will be true only when both condition1 and condition2 are true.
Syntax:
SELECT *FROM table_name WHERE condition1 AND condition2;
We can combine N number of conditions using AND operator. For an action to be taken by the SQLite statement, whether it be a transaction or query, all conditions separated by the AND must be TRUE.
Example:
SELECT *FROM STUDENTS WHERE NAME = ‘PRIYA’ AND ADDRESS = ‘ASSAM’;
OR Operator
The OR operator is also used to combine multiple conditions in a SQLite statement’s WHERE clause. While using OR operator, complete condition will be assumed true when at least any of the conditions is true. For example, [condition1] OR [condition2] will be true if either condition1 or condition2 is true.
Syntax:
SELECT * FROM table_name WHERE condition1 OR condition2;
We can combine N number of conditions using OR operator. For an action to be taken by the SQLite statement, whether it be a transaction or query, only any ONE of the conditions separated by the OR must be TRUE.
Example:
SELECT *FROM STUDENTS WHERE ADDRESS = ‘ASSAM’ OR ADDRESS = ‘ARUNACHAL’;
NOT Operator:
The NOT operator in SQL is a logical operator used to negate a condition, effectively reversing its truth value. It can be used with various other operators and conditions to filter data based on what does not match a specific criterion.
Example:
To select all students whose address is not ‘Tinsukia’:
SELECT * FROM STUDENTS WHERE NOT ADDRESS = ’Tinsukia’;
Alternatively, using the not equal operator (!= or <>),
Example:
SELECT * FROM STUDENTS WHERE ADDRESS != ’Tinsukia’;
Other Useful Operators
BETWEEN Operator:
The SQLite BETWEEN operator is a logical operator used to test whether a value falls within a specified range. It is inclusive, meaning that both the beginning and ending values of the range are included in the selection. The BETWEEN operator can be used with numbers, text, or dates.
Syntax:
SELECT column1, column2, …. FROM table_name WHERE column_name BETWEEN value1 AND value2;
Example:
SELECT NAME, ADDRESS FROM STUDENT WHERE ROLL_NO BETWEEN 2 AND 6;
SELECT * FROM STUDENTS WHERE DOB BETWEEN ’02-03-2000′ AND ’07-02-2005′;
SELECT * FROM STUDENTS WHERE NAME BETWEEN ‘A’ AND ‘M’;
Equivalence:
The expression column_name BETWEEN value1 AND value2 is logically equivalent to column_name >= value1 AND column_name <= value2.
Example:
SELECT *FROM STUDENT WHERE ROLL_NO>=2 and ROLL_NO<=6;
Using with NOT:
The BETWEEN operator can also be combined with the NOT operator to select values that fall outside the specified range.
Example:
To select students with a Roll_NO that is not between 2 and 6:
SELECT *FROM STUDENT WHERE ROLL_NO NOT BETWEEN 2 AND 6;
IN Operator:
The SQLite IN operator is a logical operator used in WHERE clauses to filter data based on whether a column’s value matches any value within a specified list. It serves as a concise alternative to using multiple OR conditions. The IN operator returns TRUE if the expression matches any of the values in the provided list
Syntax:
SELECT * FROM table_name WHERE column_name IN (value1, value2, …);
Example:
To select all students whose address is either ‘Tinsukia’ or ‘Dibrugarh’:
SELECT * FROM STUDENTS WHERE ADDRESS IN (‘TINSUKIA’, ‘DIBRUGARH’);
NOT IN Operator:
The NOT IN operator is the inverse of IN. It returns TRUE if the expression does not match any of the values in the list.
Example:
To select all students who are not from ‘Tinsukia’ or ‘Dibrugarh’:
SELECT * FROM STUDENTS WHERE ADDRESS NOT IN (‘TINSUKIA’, ‘DIBRUGARH’);
LIKE Operator
The SQLite LIKE operator is used to perform pattern matching on text values. It allows filtering data based on whether a string matches a specified pattern, often used in the WHERE clause of SELECT, UPDATE, or DELETE statements.
The LIKE operator uses two special wildcard characters:
- % (Percent Sign)
- _ (Underscore)
The percent sign represents zero, one, or multiple characters. The underscore represents a single character. These symbols can be used in combinations. By default, the LIKE operator in SQLite is case-insensitive. For example, ‘a’ LIKE ‘A’ returns true.
Syntax:
SELECT column1, column2, …. FROM table_name WHERE column_name LIKE pattern;
Examples:
To retrieve records whose name begins with P, such as Priyanka, Priya, Priyashree, Priyamoni
SELECT NAME, ADDRESS FROM STUDENT WHERE NAME LIKE ‘P%’;
To retrieve records whose name ends with a, such as Priyanka, Riya, Puja, Lalita
SELECT NAME, ADDRESS FROM STUDENT WHERE NAME LIKE ‘%a’;
To retrieve records whose name contains the word PRIYA, such as PRIYANKA, PRIYA, PRIYASHREE, PRIYAMONI
SELECT NAME, ADDRESS FROM STUDENT WHERE NAME LIKE ‘%PRIYA%’;
To retrieve records whose name second character is a, such as Raja, Sardeep, Nayana
SELECT NAME, ADDRESS FROM STUDENT WHERE NAME LIKE ‘_a%’;
NOT LIKE:
To select students whose name do not start with the letter ‘A’:
Example:
SELECT * FROM students WHERE Name NOT LIKE ‘A%’;
ORDER BY Clause
ORDER BY clause is used for sorting the data in an ascending or descending order, based on one or more columns.
Syntax:
SELECT column1, column2, … FROM table_name ORDER BY column_name [ASC|DESC];
ASC (Ascending):
This keyword sorts the data in ascending order (A-Z for text, 0-9 for numbers, earliest to latest for dates). It is the default sorting order if no ASC or DESC keyword is provided.
Example:
To sort the student data, in the alphabetic order of name.
SELECT NAME, ADDRESS FROM STUDENTS ORDER BY NAME;
By default, sorting is in the ascending order of the specified key field, i.e., NAME
OR
SELECT NAME, ADDRESS FROM STUDENTS ORDER BY NAME ASC;
DESC (Descending):
This keyword sorts the data in descending order (Z-A for text, 9-0 for numbers, latest to earliest for dates).
Example:
SELECT NAME, ADDRESS FROM STUDENTS ORDER BY ADDRESS DESC;
GROUP BY Clause
SQLite GROUP BY clause is used in collaboration with the SELECT statement to arrange identical data into groups. GROUP BY clause follows the WHERE clause in a SELECT statement and precedes the ORDER BY clause.
Syntax:
SELECT column-list FROM table_name WHERE conditions GROUP BY column1, column2, … ORDER BY column1, column2, …;
HAVING Clause
HAVING clause enables us to specify conditions that filter which group results appear in the final results. The WHERE clause places conditions on the selected columns, whereas the HAVING clause places conditions on groups created by GROUP BY clause. HAVING clause must follow GROUP BY clause in a query and must also precede ORDER BY clause if used.
Syntax:
SELECT column1, column2 FROM table_name WHERE conditions GROUP BY column1, column2 HAVING conditions ORDER BY column1, column2
DISTINCT Keyword
SQLite DISTINCT keyword is used in conjunction with SELECT statement to eliminate all the duplicate records and fetching only the unique records.
There may be a situation when we have multiple duplicate records in a table. While fetching such records, it makes more sense to fetch only unique records instead of fetching duplicate records.
Syntax:
SELECT DISTINCT column_name FROM table_name;
OR
SELECT DISTINCT column1, column2, … FROM table_name;
SQLite – Limit and Offset Clause
The SQLite LIMIT clause restricts the maximum number of rows returned by a query, while the OFFSET clause specifies how many rows to skip before starting to retrieve the data.
Syntax:
SELECT column1, column2, … FROM table_name LIMIT row_count OFFSET skip_count;
Example:
SELECT * FROM STUDENT LIMIT 5;
SELECT * FROM STUDENT LIMIT 3 OFFSET 2;
SQLite Functions
SQLite offers a comprehensive library of built-in functions for performing calculations, manipulating data, and retrieving information. Functions are grouped into several categories, including aggregate, date/time, string, mathematical functions etc.
Aggregate Functions
Aggregate functions perform calculations on a set of values and return a single summary value. They are often used with the GROUP BY clause to perform a calculation on each group of rows.
Some commonly used aggregate functions include SUM(), TOTAL(), AVG(), MAX(), MIN(), COUNT() etc.
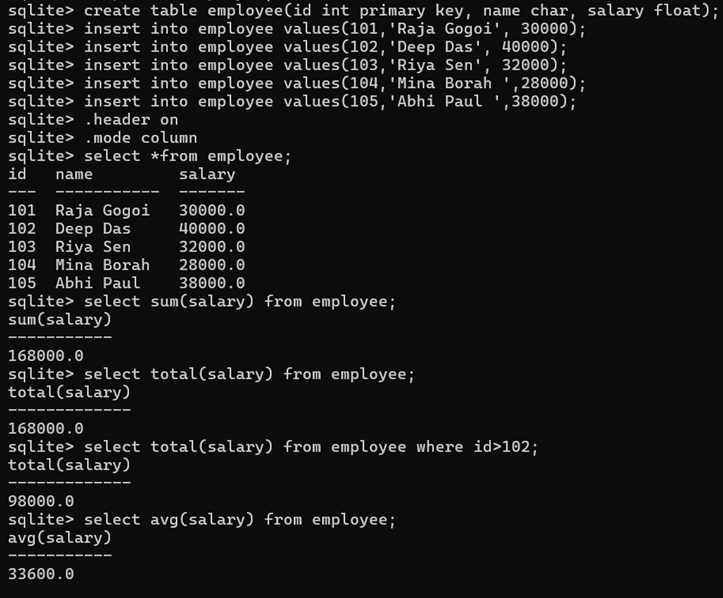
SUM():
Calculates the sum of all non-NULL values in a specified column. If there are no non-NULL input rows, SUM() returns NULL. For situations where we want 0.0 instead, SQLite offers the TOTAL() function..
Example:
— Calculate the sum of all salaries
SELECT SUM(salary) FROM Employee;
TOTAL()
The TOTAL() function in SQLite is an aggregate function that returns the sum of all non-NULL values in a group. It is very similar to the SUM() function, but with two key differences:
Result for no non-NULL rows: TOTAL() returns 0.0 if there are no non-NULL input rows, while the standard-compliant SUM() function returns NULL.
Return data type: TOTAL() always returns a floating-point value. SUM() returns an integer only if all non-NULL inputs are integers; otherwise, it returns a floating-point value.
Example:
SELECT TOTAL(salary) FROM Employee;
SELECT TOTAL(salary) FROM Employee WHERE id > 102;
AVG():
Computes the average value of all non-NULL values in a specified column. The result is always a floating-point number if there is at least one non-NULL input.
Example:
SELECT AVG(salary) FROM Employee;
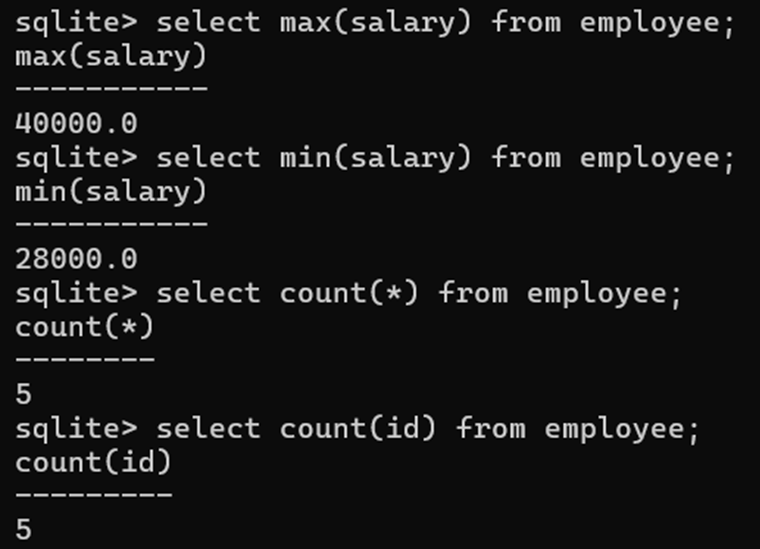
MAX():
Returns the maximum value of all values in a group.
Example:
SELECT MAX(salary) FROM Employee;
MIN():
Returns the minimum non-NULL value of all values in a group.
Example:
SELECT MIN(salary) FROM Employee;
COUNT():
Returns the number of rows that match a specified condition. COUNT(*) counts all rows in the group, while COUNT(column_name) counts only the rows where column_name is not NULL.
Example:
SELECT COUNT(*) FROM Employee;
SELECT COUNT(id) FROM Employee;
To perform an aggregate function on only unique values, use the DISTINCT keyword. This filters duplicate elements before the calculation.
Example:
— Count the number of unique departments in the employees table
SELECT COUNT(DISTINCT dept_id) FROM Employee;
Practical Example:
String Functions
SQLite offers a various built-in string functions to manipulate and analyze text data within columns. These functions can be used in SELECT statements, WHERE clauses, and other parts of SQL queries. Examples include LENGTH(), UPPER(), LOWER(), SUBSTR(), TRIM(), INSTR() etc.
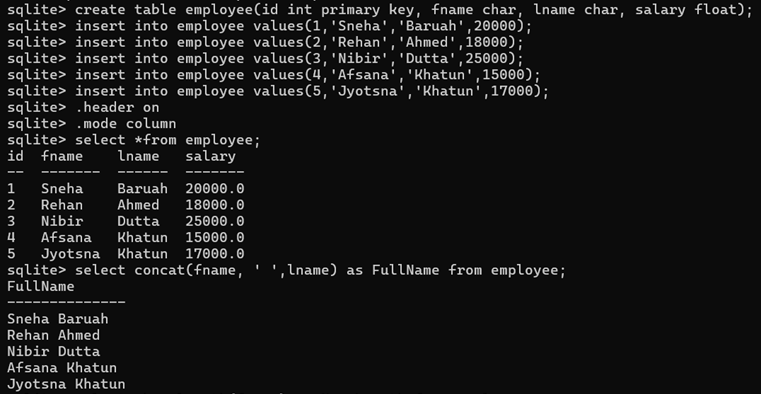
CONCAT():
Combines two or more string expressions into a single string.
Example:
SELECT CONCAT(fname, ‘ ‘, lname) AS FullName FROM Employee;
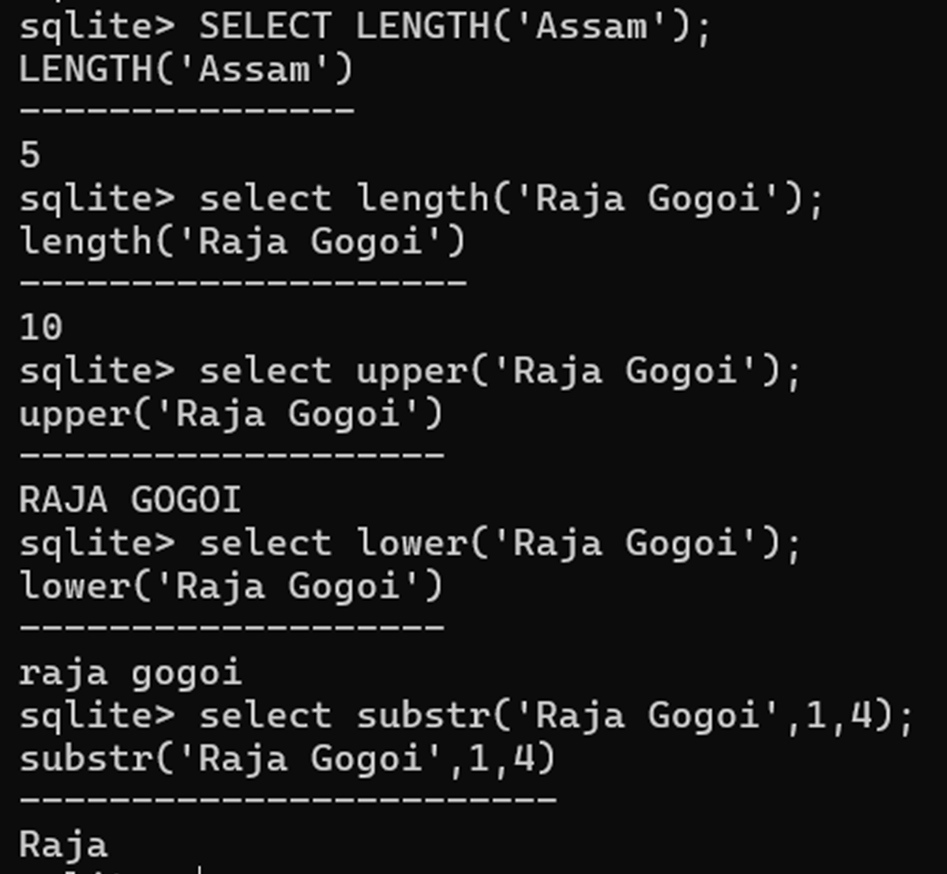
LENGTH():
Returns the number of characters of a string.
Example:
SELECT LENGTH(‘Assam’);
SELECT LENGTH(Fname) FROM Employee;
UPPER():
Converts all characters in a string to uppercase.
Example:
SELECT UPPER(‘hello world’);
SELECT UPPER(Fname) FROM Employee;
LOWER():
Converts all characters in a string to lowercase.
Example:
SELECT LOWER(‘HELLO WORLD’);
SELECT LOWER(Fname) FROM Employee;
SUBSTR(X,Y,Z):
Extracts a substring of length Z from string X, starting at position Y. If Z is omitted, it extracts until the end of the string.
Example:
SELECT SUBSTR(‘SQL Tutorial’, 5, 8);
SELECT SUBSTR(Fname, 1, 3) FROM Employee;
REPLACE(X,Y,Z):
Returns a copy of string X with every occurance of substring Y replaced by substring Z.
Example:
select address, replace(address,’tsk’,’Tinsukia’) from student;
select fname, replace(fname, ‘Sneha’, ‘Neha’) AS NewName from employee where id=1;
Practical Example:
Trim():
In SQLite, the TRIM() function removes characters from both the beginning and end of a string. By default, it removes spaces, but we can also specify a set of custom characters to remove. The TRIM() function will clean up any whitespace at the start and end of a string.
Example:
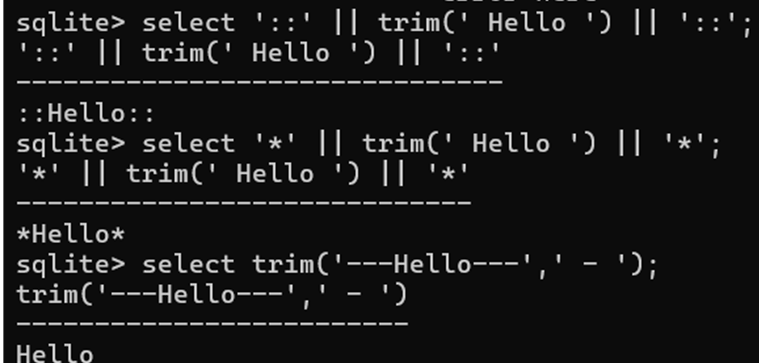
INSTR():
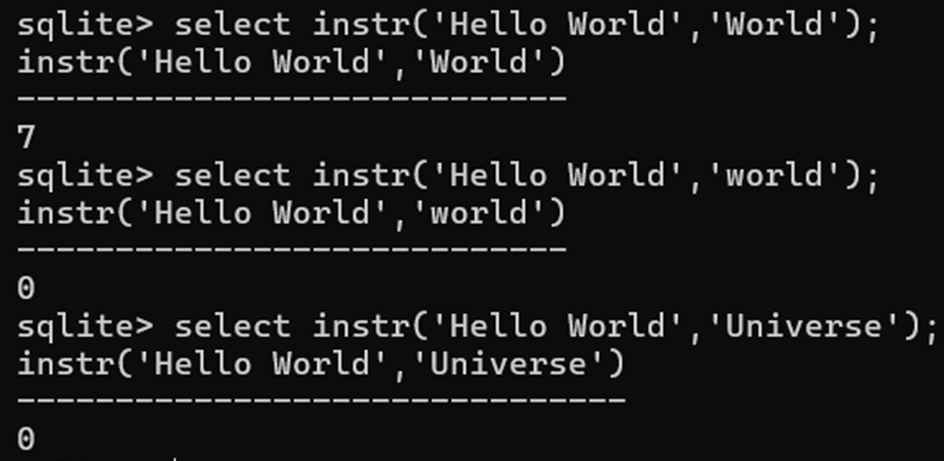
The INSTR() function in SQLite finds the first occurrence of a substring within a larger string and returns its position. If the substring is not found, the function returns 0. INSTR() is case-sensitive.
Example:
Practical Example:

Date and Time Functions
SQLite provides a set of built-in date and time functions to handle date and time values. These functions can store dates and times as TEXT, REAL OR INTEGER.
DATE():
Returns the date in the format YYYY-MM-DD
Syntax:
DATE(timestring, …)
Example:
To get the current date:
SELECT DATE(‘now’);
TIME():
Returns the time in the format HH:MM:SS
Syntax:
TIME(timestring, …)
Example:
To get the current time:
allegheny county real estate Hi there to all, for the reason that I am genuinely keen of reading this website’s post to be updated on a regular basis. It carries pleasant stuff.
Techarp Awesome! Its genuinely remarkable post, I have got much clear idea regarding from this post . Techarp
Thanks for sharing. I read many of your blog posts, cool, your blog is very good.
Thanks for sharing. I read many of your blog posts, cool, your blog is very good.