Views are logical tables of data extracted from existing tables. It can be quired just like a table, but does not require disk space. Like a regular table, a view consists of rows and columns, but it does not store its own data. Instead, it pulls data from its underlying base tables every time it is queried, ensuring the data is always up-to-date.
A view is a virtual table that is created from the result-set of an SQL SELECT statement. It does not store physical data; instead, it stores the query definition and produces data dynamically when accessed. When a view is queried, the underlying SELECT statement is executed to retrieve the data from the base table. Views behave like regular tables in terms of querying, allowing us to SELECT from them. A view can contain all rows of a table or selected rows from one or more tables. Views are read-only meaning we cannot perform INSERT, UPDATE or DELETE operations directly on a view.
Key Characteristics of SQLite Views:
Virtual Table: A view appears and functions like a regular table, and can be used in the FROM clause of other SELECT statements.
Read-Only: By default, Views are read-only. We cannot directly use INSERT, UPDATE, or DELETE statements on a view.
No Data Storage: Views do not store data. They just store SQL query that defines them.
Dynamic content: The contents of a view are generated dynamically each time it is accessed, so it always reflects the current state of its base tables.
Security: They enhance security by restricting user access to specific columns or rows, allowing users to interact with a subset of data without direct access to the base tables.
Advantages of using Views
Data abstraction: They provide a layer of abstraction that hides the underlying database schema from the end user or application. This improves code readability and maintainability.
Enhanced security: Views can restrict access to sensitive information by limiting which columns or rows are visible. Users can be granted access to the view without having direct access to the base tables.
Creating a View / How to create a view
A view is created using the CREATE VIEW statement, followed by the view’s name, the AS keyword and then the SELECT statement that defines the view’s data.
Syntax:
CREATE VIEW view_name AS SELECT columns FROM table_name;
OR
CREATE VIEW view_name AS SELECT columns FROM table_name WHERE conditions;
Example:
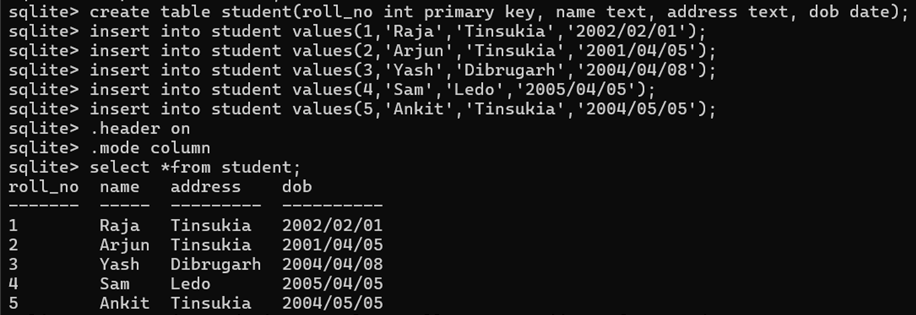
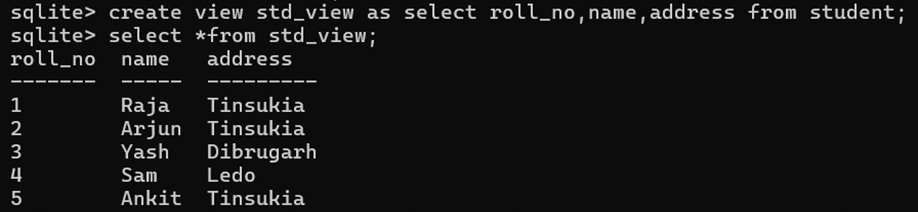
CREATE VIEW STD_VIEW AS SELECT roll, name, address FROM student;
CREATE VIEW STD_VIEW AS SELECT roll, name, address FROM student where address = ’Assam’;
Display View
Once created, a view can be queried just like a regular table. The most common way to display the data contained within a view is to use a SELECT statement, just as one would with a table.
Syntax:
SELECT * FROM view_name;
SELECT column_name FROM view_name WHERE condition;
Example:
SELECT * FROM std_view;
SELECT * FROM std_view WHERE name = “Raja”;
Practical Example:

Listing Views in SQLite:
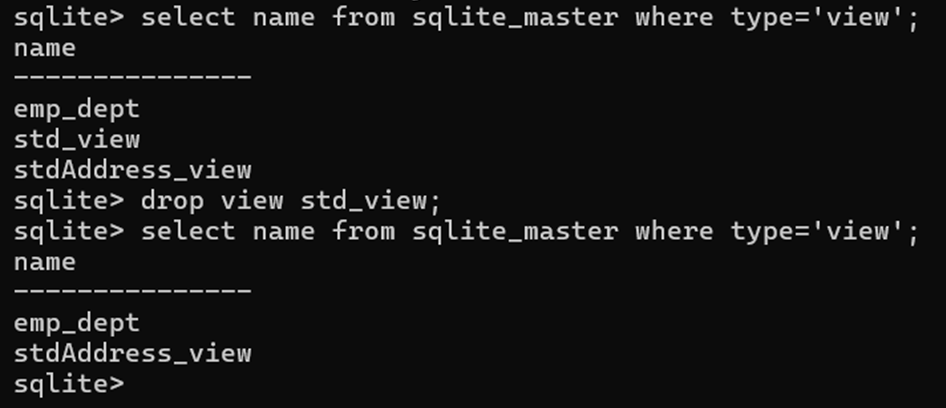
To list all the views in the current SQLite database, we can query the sqlite_master table, which stores information about all database objects (tables, views etc).
Syntax:
SELECT name FROM sqlite_master WHERE type = ‘view’;
Example:
SELECT name FROM sqlite_master WHERE type = ‘view’;
Deleting a View / Dropping a View
To delete an existing view, simply use the DROP VIEW statement with the view_name.
Syntax:
DROP VIEW view_name;
Example:
DROP VIEW std_view;
Practical Example:
View with Join Statement
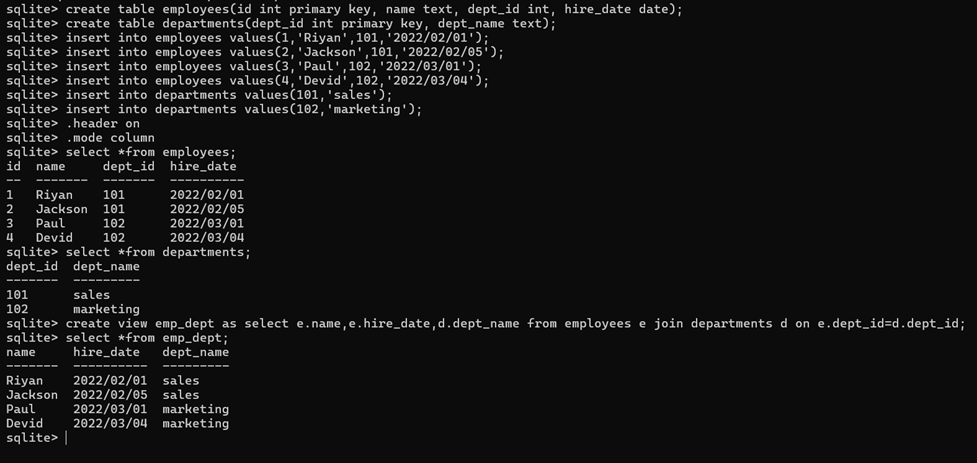
Suppose we have the following employees table:
create table employees(id int primary key, name text, dept_id int, hire_date date);
Suppose we have another table called departments:
create table departments(dept_id int primary key, dept_name text);
We can create a view that combines data from both the employees and departments tables:
create view emp_dept as select e.name, e.hire_date, d.dept_name from employees e join departments d on e.dept_id = d.dept_id;
Now, querying the view gives us a result that combines employee names, hire dates, and department names:
select * from emp_dept;
This query will return data from both tables, employees and departments as if it were a single table, but the underlying data is still stored in the original tables.
Practical Example: